Angular 2 模板语法
前面几个章节我们已经接触了 Angular 的模板,本文我们将具体介绍 Angular 的语法使用。
模板扮演的是一个视图的角色,简单讲就是展示给用户看的部分。
-
HTML
-
插值表达式
-
模板表达式
-
模板语句
-
绑定语法
-
属性绑定
-
HTML 属性、 class 和 style 绑定
-
事件绑定
-
使用 NgModel 进行双向数据绑定
-
内置指令
-
* 与 <template>
-
模板引用变量
-
输入输出属性
-
模板表达式操作符
HTML
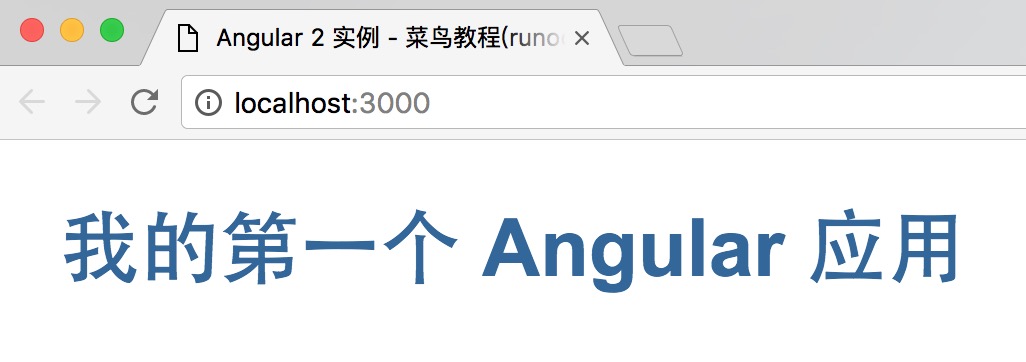
HTML 是 Angular 模板的"语言",除了 <script> 元素是被禁用的外 ,其他 HTML 元素都是支持的,例如:
<h1>我的第一个 Angular 应用</h1>
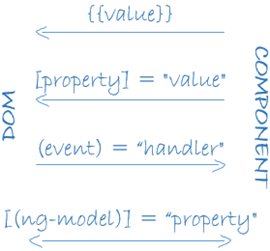
插值表达式
插值表达式的语法格式为:{{ ... }}。
插值表达式可以把计算的字符串插入HTML中,也可以作为属性值来使用。
<h3>
{{title}}
<img src="{{imageUrl}}" style="height:30px">
</h3>
模板表达式
{{ ... }} 里头其实就是一个模板表达式,Angular 会对其进行求值并转化为字符串输出。
以下实例是两个数相加:
<p>The sum of 1 + 1 is {{1 + 1}}</p>
我们可以使用 getVal() 来获取这个表达式的值:
<div class="example">
<div class="example_code">
[mycode3 type="html"]
<p>{{1 + 1 + getVal()}}</p>
模板表达式类似 JavaScript 的语言,很多 JavaScript 表达式也是合法的模板表达式,但不是全部。
以下 JavaScript 表达式是禁止的:
- 赋值表达式(
=,+=,-=...)
- new操作符
- 带有
;或者'的连接表达式
- 自增和自减操作(
++和--)
其他与Javascript语法不同的值得注意的包括:
- 不支持位运算符(
|和&)
- 模板表达式的操作符,如
|和?.等,被赋予了新的含义
属性绑定
模板的属性绑定可以把视图元素的属性设置为模板表达式 。
最常用的属性绑定是把元素的属性设置为组件中属性的值。 下面这个例子中, image 元素的 src 属性会被绑定到组件的 imageUrl 属性上:
当组件为 isUnchanged( 未改变 ) 时禁用一个按钮:
<button [disabled]="isUnchanged">按钮是禁用的</button>
设置指令的属性:
<div [ngClass]="classes">[ngClass]绑定到classes 属性</div>
设置一个自定义组件的属性(这是父子组件间通讯的重要途径):
<user-detail [user]="currentUser"></user-detail>
HTML 属性(Attribute)、 class 和 style 绑定
模板语法为那些不太适合使用属性绑定的场景提供了专门的单向数据绑定形式。
属性(Attribute)、绑定
当元素没有属性可绑的时候,使用HTML标签属性(Attribute)绑定。
考虑 ARIA, SVG 和 table 中的 colspan/rowspan 等属性(Attribute) 。它们是纯粹的属性 。 它们没有对应的属性可供绑定。
以下实例会报错:
<tr><td colspan="{{1 + 1}}">Three-Four</td></tr>
我们会得到这个错误:
Template parse errors:
Can't bind to 'colspan' since it isn't a known native property

模板解析错误:不能绑定到'colspan',因为它不是已知的原生属性
正如提示中所说, <td> 元素没有 colspan 属性。
但是插值表达式和属性绑定只能设置 属性 ,而不是 Attribute,所以需HTML标签 Attribute 绑定来创建和绑定类似的Attribute。
HTML标签特性绑定在语法上类似于属性绑定,但中括号中的部分不是一个元素的属性名,而是由一个attr.的前缀和HTML标签属性的名称组成,然后通过一个能求值为字符串的表达式来设置HTML标签属性的值。如:
<table border=1>
<tr><td [attr.colspan]="1 + 1">One-Two</td></tr>
<tr><td>Five</td><td>Six</td></tr>
</table>
css类绑定
借助 CSS 类绑定 ,我们可以从元素的 class 属性上添加和移除 CSS 类名。
CSS 类绑定在语法上类似于属性绑定。但方括号中的部分不是一个元素的属性名,而是包括一个 class 前缀,紧跟着一个点 (.) ,再跟着 CSS 类的名字组成。 其中后两部分是可选的。例如: [class.class-name] 。
下面的例子展示了如何通过css类绑定类添加和移除"special"类:
<div class="bad curly special">Bad curly special</div>
<div class="bad curly special" [class]="badCurly">Bad curly</div>
<div [class.special]="isSpecial">这个样式比较特殊</div>
style样式绑定
通过样式绑定,可以设置内联样式。样式绑定语法上类似于属性绑定,但中括号里面的部分不是一个元素的属性名,样式绑定包括一个style.,紧跟着css样式的属性名,例如:[style.style-property]。
<button [style.color] = "isSpecial ? 'red': 'green'">红色</button>
<button [style.background-color]="canSave ? 'cyan': 'grey'" >保存</button>
<button [style.font-size.em]="isSpecial ? 3 : 1" >大</button>
<button [style.font-size.%]="!isSpecial ? 150 : 50" >小</button>
样式属性可以是中线命名法(font-size),也可以是驼峰是命名法(fontSize)。
事件绑定
在事件绑定中,Angular通过监听用户动作,比如键盘事件、鼠标事件、触屏事件等来响应相对应的数据流向-从视图目标到数据源。
事件绑定的语法是由等号左侧小括号内的 目标事件 和右侧引号中的 模板声明 组成。
比如下面这个例子,是事件绑定监听按钮的点击事件。只要点击鼠标,都会调用组件的 onSave()方法。
<button (click)="onSave()">保存</button>
圆括号中的名称 ——比如 (click) ——标记出了目标事件。在下面这个例子中,目标是按钮的 click 事件。
<button (click)="onSave()">Save</button>
也可以使用on- 前缀的形式:
<button on-click="onSave()">On Save</button>
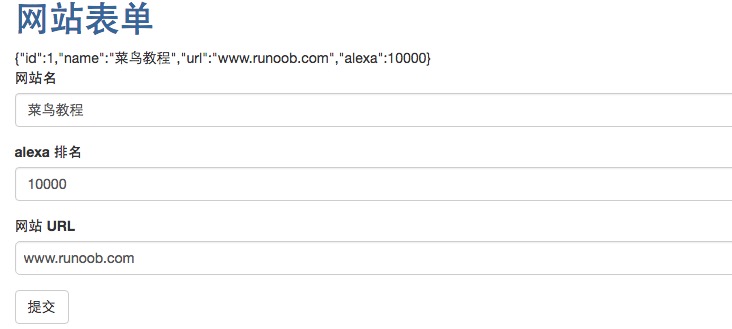
使用 NgModel 进行双向数据绑定
当开发数据输入表单时,期望的结果是既能将组件的数据显示到表单上,也能在用户修改时更新组件的数据。
以下是一个通过 [(NgModel)] 来实现双向绑定:
<input [(ngModel)]="currentUser.firstName">
[]实现了数据流从组件到模板,()实现了数据流从模板到组件,两者一结合[()]就实现了双向绑定。
使用前缀形式的语法:
<input bindon-ngModel="currentUser.firstName">
内置指令
Angular 的内置指令有 NgClass、NgStyle、NgIf、NgFor、NgSwitch等。
NgClass
通过绑定到 NgClass 动态添加或删除 CSS 类。
<div [style.font-size]="isSpecial ? 'x-large' : 'smaller'" >
这个div是大号的。
</div>
NgStyle
NgStyle 通过把它绑定到一个key:value控制对象的形式,可以让我们同时设置很多内联样式。
setStyles() {
let styles = {
// CSS属性名
'font-style': this.canSave ? 'italic' : 'normal', // italic
'font-weight': !this.isUnchanged ? 'bold' : 'normal', // normal
'font-size': this.isSpecial ? '24px' : '8px', // 24px
};
return styles;
}
通过添加一个NgStyle属性绑定,让它调用setStyles,并据此来设置元素的样式:
<div [ngStyle]="setStyles()">
这个div的样式是italic, normal weight, 和extra large (24px)。
</div>
NgIf
通过把NgIf指令绑定到一个真值表达式,可以把一个元素及其子元素添加到DOM树上。
<div *ngIf="currentUser">Hello,{{currentUser.firstName}}</div>
相反,绑定到一个假值表达式将从DOM树中移除该元素及其子元素。如:
<user-detail *ngIf="isActive"></user-detail>
NgSwitch
当需要从一组可能的元素树中根据条件显示其中一个时,就需要NgSwitch了。Angular将只把选中的元素添加进DOM中。如:
<span [ngSwitch]="userName">
<span *ngSwitchCase="'张三'">张三</span>
<span *ngSwitchCase="'李四'">李四</span>
<span *ngSwitchCase="'王五'">王五</span>
<span *ngSwitchCase="'赵六'">赵六</span>
<span *ngSwitchDefault>龙大</span>
</span>
把作为父指令的NgSwitch绑定到一个能返回开关值的表达式,例子中这个值是字符串,但它可以是任何类型的值。父指令NgSwitch控制一组<span>子元素。每个<span>或者挂在一个匹配值的表达式上,或者被标记为默认情况。任何时候,这些span中最多只有一个会出现在DOM中。如果这个span的匹配值和开关值相等,Angular2就把这个<span>添加DOM中。如果没有任何span匹配上,Angular2就会把默认的span添加到DOM中。Angular2会移除并销毁所有其他的span。
三个相互合作的指令:
- ngSwitch:绑定到一个返回开关值的表达式
- ngSwitchCase:绑定到一个返回匹配值的表达式
- ngSwitchDefault:一个用于标记默认元素的属性
注意:不要再ngSwitch前使用
*,而应该用属性绑定,但ngSwitchCase和ngSwitchDefault前面要放*。
NgFor
当需要展示一个由多个条目组成的列表时就需要这个指令了。如下面这个例子,就是在一个HTML块上应用NgFor。
<div *ngFor="let user of users">{{user.fullName}}</div>
NgFor也可以应用在一个组件元素上,如:
<user-detail *ngFor="let user of users" [user]="user"></user-detail>
ngFor指令支持一个可选的index索引,在迭代过程中会从0增长到数组中的长度。
可以通过模板输入变量来捕获这个index,并应用在模板中。下面的例子就把index捕获到了一个名为i的变量中。
<div *ngFor="let user of users; let i=index">{{i + 1}} - {{user.fullName}}</div>
NgForTrackBy
ngFor 指令有时候会性能较差,特别是在大型列表中。 对一个条目的一点小更改、移除或添加,都会导致级联的 DOM 操作。
比如,当通过重新从服务器来刷新通讯录,刷新后的列表可能包含很多(如果不是全部的话)以前显示过的联系人。但在Angular看来,它不知道哪些是以前就存在过的,只能清理旧列表、舍弃那些DOM元素,并用新的DOM元素来重建一个新列表。
解决这个问题,可以通过追踪函数来避免这种折腾。追踪函数会告诉Angular:我们知道两个具有相同user.id的对象是同一个联系人。如:
trackByUsers(index: number, user: User){return user.id}
然后,把NgForTrackBy指令设置为那个追踪函数:
<div *ngFor="let user of users; trackBy:trackByUsers">({{user.id}}) {{user.fullName}}</div>
追踪函数不会排除所有DOM更改。如果用来判断是否为同一个联系人的属性变化了,就会更新DOM元素,反之就会留下这个DOM元素。列表界面就会变得比较更加平滑,具有更好的响应效果。
模板引用变量
模板引用变量是模板中对 DOM 元素或指令的引用。
它能在原生 DOM 元素中使用,也能用于 Angular 组件——实际上,它可以和任何自定义 Web 组件协同工作。
我们可以在同一元素、兄弟元素或任何子元素中引用模板引用变量。
这里是关于创建和使用模板引用变量的两个例子:
<input #phone placeholder="phone number">
<button (click)="callPhone(phone.value)">Call</button>
<input ref-fax placeholder="fax number">
<button (click)="callFax(fax.value)">Fax</button>
"phone" 的 (#) 前缀意味着我们将要定义一个 phone 变量。


点我分享笔记